Ever wondered how channels create those engaging "Top 10" list videos consistently? While some do it manually, you can actually automate a large part of the process! This tutorial will show you how to use the automation tool N8N and the video creation API JSON2Video to automatically generate and upload "Top 10" videos to your YouTube channel, based on topics you list in a simple Google Sheet.
Nate Herk created an amazing video tutorial on how to create long-form Top 10 videos automatically with JSON2Video API and N8N.
Tutorial
The tutorial explains how to connect Google Sheets with N8N to keep a list of the videos you want to create, then use OpenAI to generate the content for each video, and finally call the JSON2Video API to create a Top 10 video.
The best of all is that you can use any topic you want and the automation will take care of the rest. For example:
- Top 10 cities in Europe
- Top 10 productivity tools
- Top 10 movies of all time
You can download all the material from the tutorial in Nate's Skool community.
No coding skills are needed, but we'll be connecting a few different services together.
Document index
- Tutorial
- What You'll Build:
- Tools You'll Need:
- Let's Get Started!
- Conclusion
- Next Steps & Customization
Tutorial
The tutorial explains how to connect Google Sheets with N8N to keep a list of the videos you want to create, then use OpenAI to generate the content for each video, and finally call the JSON2Video API to create a Top 10 video.
The best of all is that you can use any topic you want and the automation will take care of the rest. For example:
- Top 10 cities in Europe
- Top 10 productivity tools
- Top 10 movies of all time
You can download all the material from the tutorial in Nate's Skool community.
No coding skills are needed, but we'll be connecting a few different services together.
What You'll Build:
An automated workflow that:
- Reads a video topic (like "Classic Movie Characters") from a Google Sheet.
- Uses a language model to write scripts for an intro, outro, and the Top 10 list items.
- Uses a language model to generate descriptive prompts for images related to each list item.
- Sends all this text and image information to JSON2Video.
- JSON2Video automatically creates the video with images, voiceover, and graphics based on a template.
- The workflow waits for the video to be ready.
- Downloads the finished video.
- Uploads the video directly to your YouTube channel (as unlisted).
- Updates the Google Sheet to mark the video as completed.
Tools You'll Need:
- N8N Account: N8N is the automation platform that connects everything. You can self-host it or use their cloud version (n8n.io).
- Google Account: For Google Sheets.
- Google Sheet: A specific sheet to list your video ideas. We'll provide a template.
- JSON2Video Account & API Key: This service turns text and image prompts into a finished video. Get a free API key to start.
- YouTube Account & API Credentials: To allow N8N to upload videos to your channel. Setting this up involves the Google Cloud Console (we'll link to resources).
- (Optional) Language model access (like OpenAI/ChatGPT via OpenRouter): The workflow in the video uses agent nodes within N8N to generate scripts and image prompts. You'll need an account with a service like OpenAI or a provider accessible through OpenRouter (openrouter.ai) and connect it to N8N.
- (Optional) ElevenLabs Account: If you want to use custom voices via ElevenLabs for the narration (JSON2Video can handle narration too).
Let's Get Started!
Step 1: Set Up Your Google Sheet
This sheet will act as your content calendar.
- Make a Copy: Click this link to get a copy of the Google Sheet template shown in the video: Top Ten Videos Template (Make a Copy)
- Understand the Columns:
- Subject (Column A): This is the topic for your Top 10 video (e.g., "Cities in Europe", "Classic Movie Characters").
- Creation Status (Column B): Use this to tell the workflow which videos to make. Set it to
To Dofor new ideas. The workflow will change it toCreatedonce done. - Posting Status (Column C): Use this to track if the video is uploaded. The workflow will set it to
Unlistedafter uploading to YouTube. You can manually change it later. - Video URL (Column D): The workflow will paste the link to the final rendered video file here (not the YouTube link, but the source file from JSON2Video).
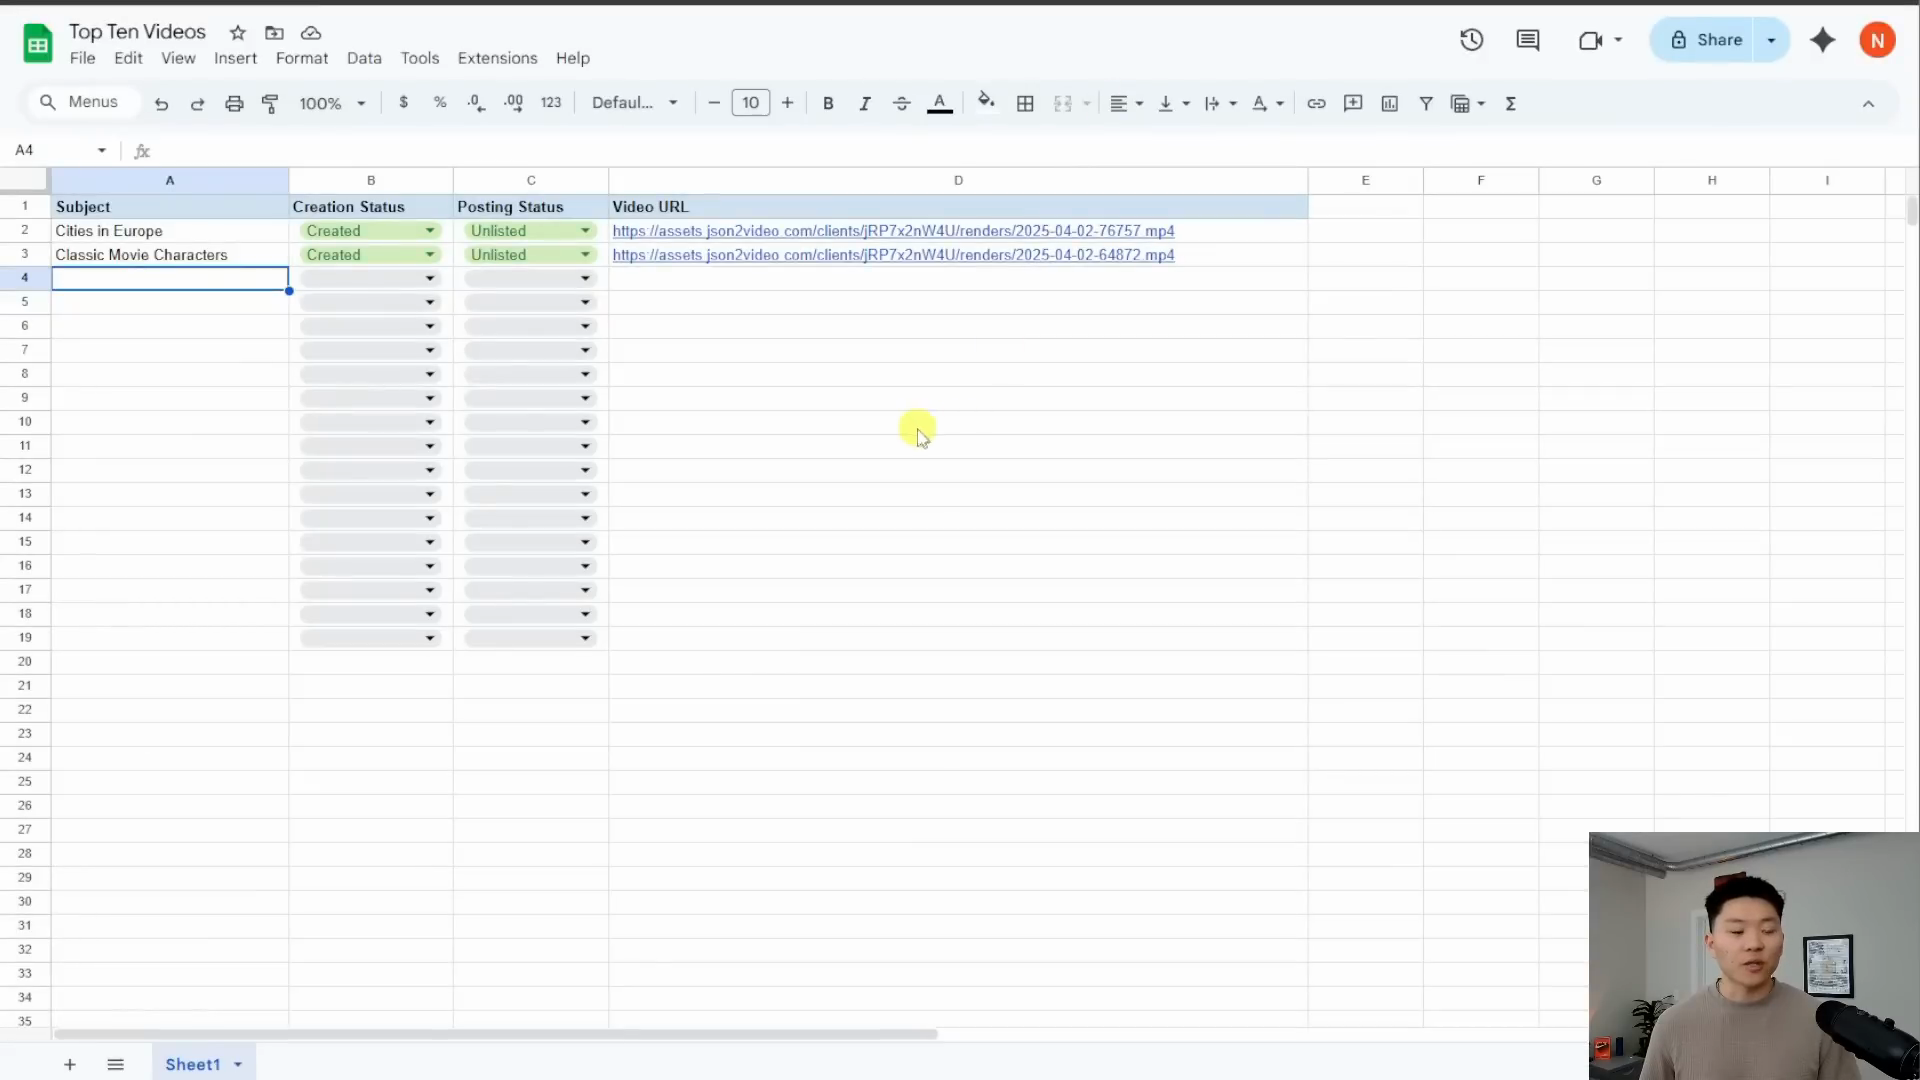
- Add Ideas: Fill in a few rows in Column A with your Top 10 video ideas and set their "Creation Status" in Column B to
To Do.
Step 2: Set Up Your N8N Workflow
N8N is where the automation happens. You can import the pre-built workflow shown in the video to save time.
- Download Workflow: Get the N8N workflow file (
.json) provided with the video tutorial. - Import to N8N: In your N8N dashboard, go to "Workflows" and click "Import from File". Upload the
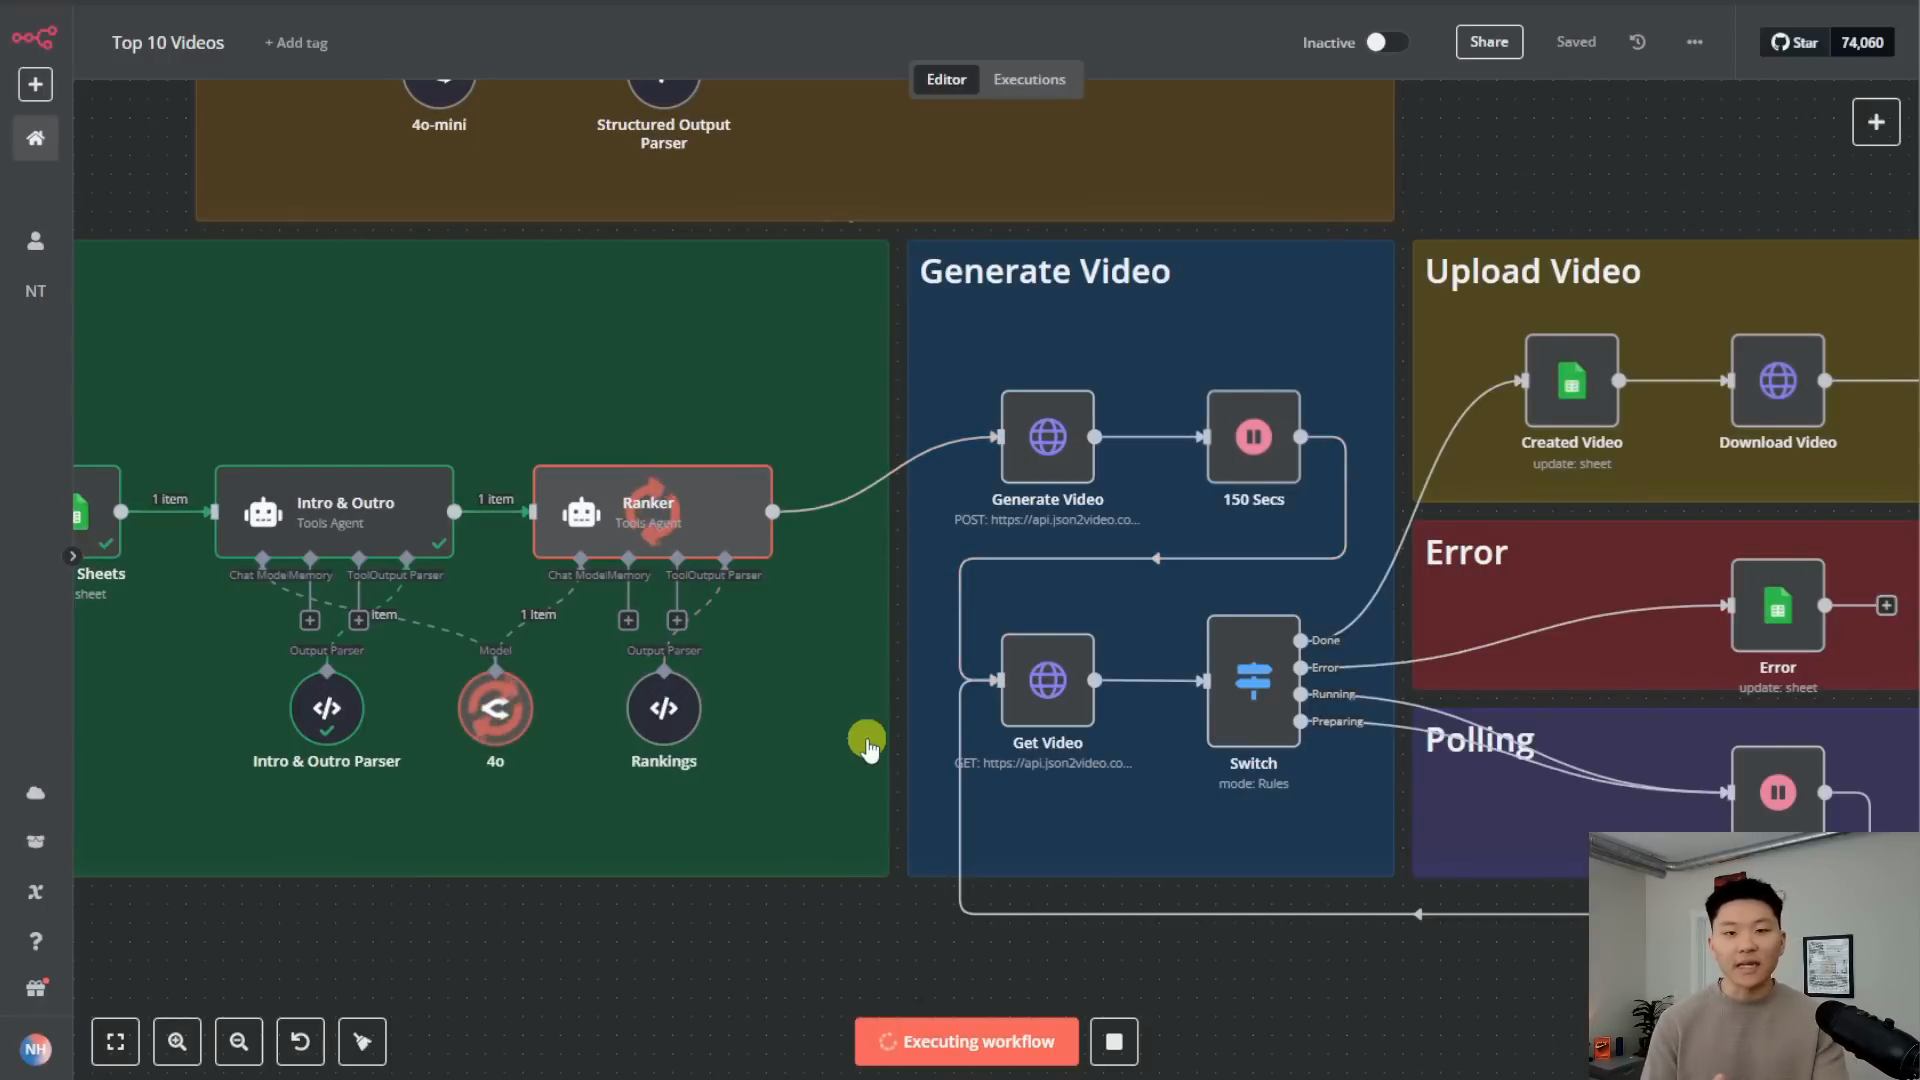
.jsonfile you downloaded. - Workflow Overview: You should now see the workflow, similar to this:

Step 3: Configure the N8N Nodes
Now, let's connect your accounts and configure each step (node) in the N8N workflow.
-
Trigger Node (Schedule Trigger)
- The video uses a manual trigger ("When clicking 'Test workflow'"), but for automation, you'll want a Schedule Trigger.
- Double-click the trigger node (it might be the "When clicking..." node initially).
- Change the trigger type to "Schedule".
- Set how often you want it to run (e.g., once a day, once an hour). This determines how often N8N checks your Google Sheet for new ideas.
-
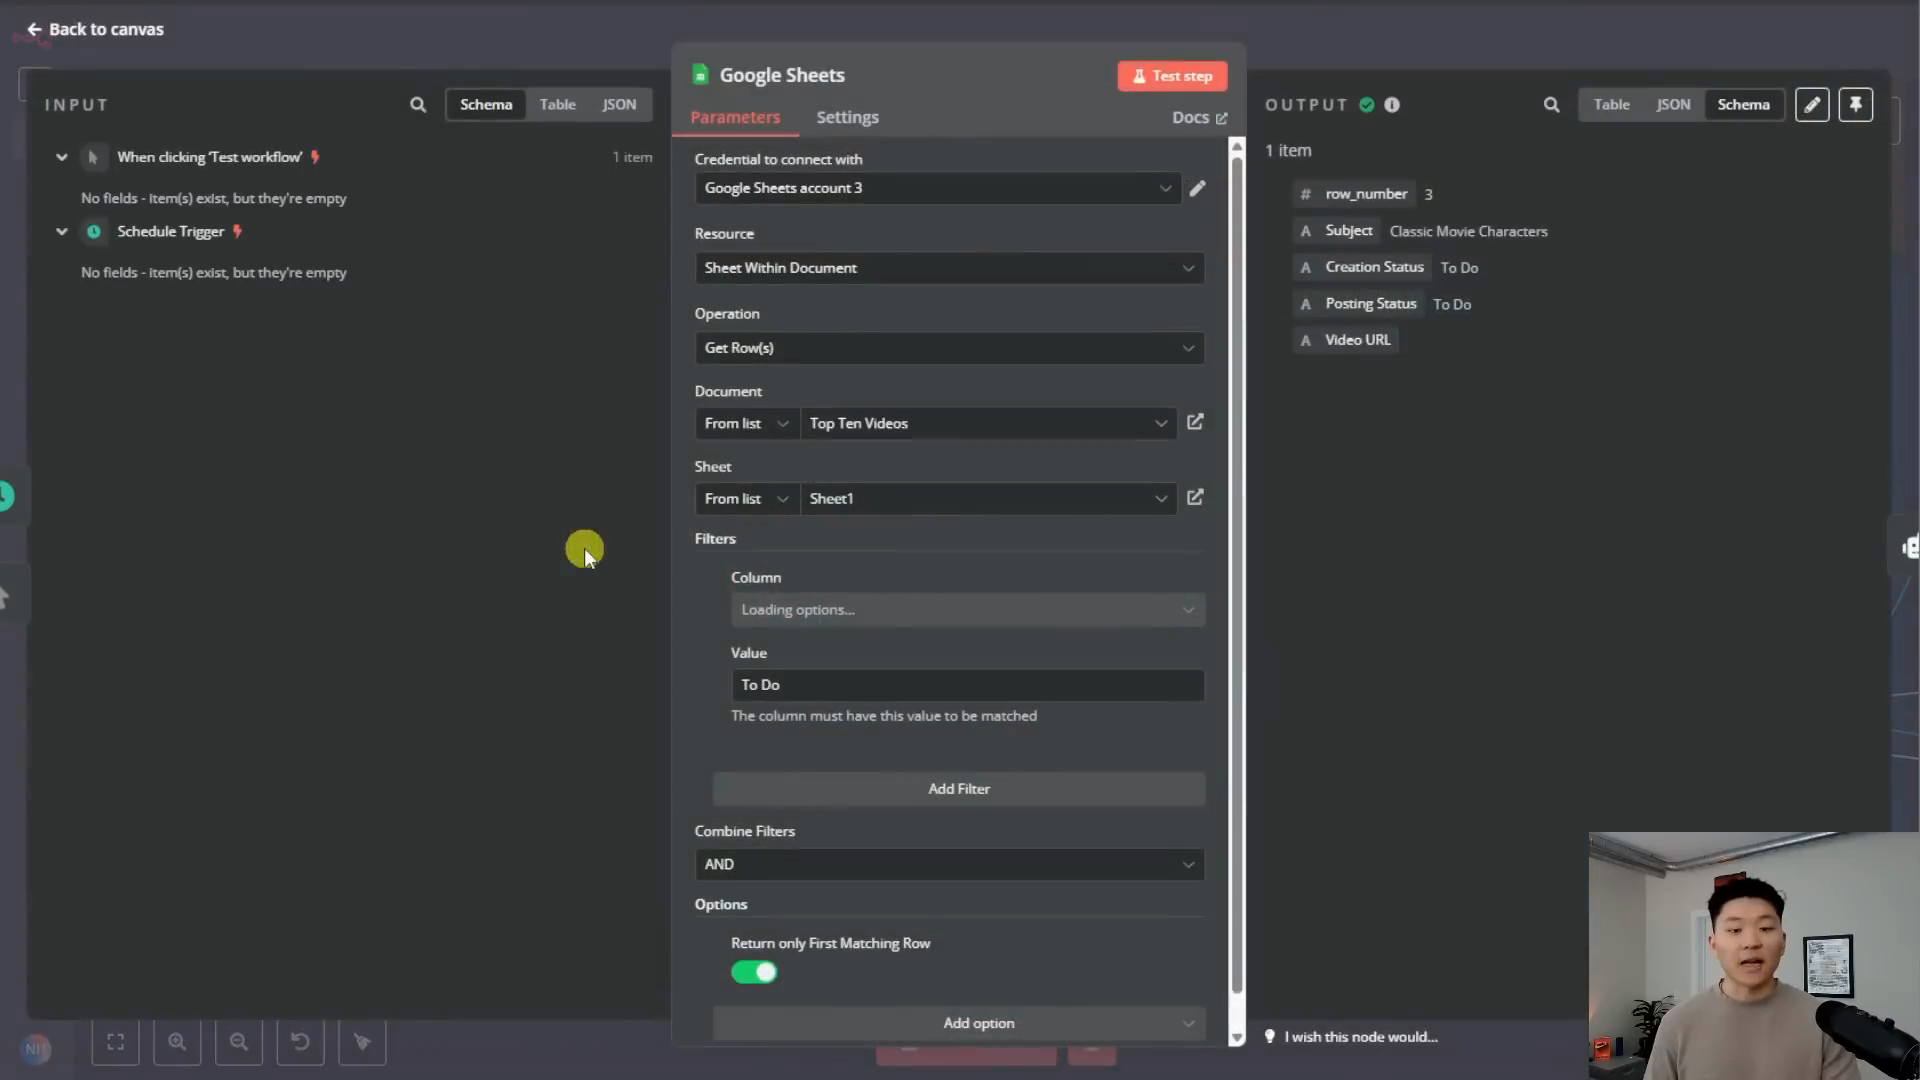
Google Sheets Node (Read Sheet)
- Double-click this node.
- Credentials: Connect your Google account if you haven't already. Click "Connect my account" and follow the prompts.
- Document: Select the "Top Ten Videos" Google Sheet you created in Step 1.
- Sheet: Select "Sheet1".
- Filters: This is important! We only want to process rows marked "To Do".
- Click "Add Filter".
- Set "Column" to
Creation Status. - Set "Value" to
To Do.
- Options: Turn ON "Return only First Matching Row". This ensures the workflow only processes one video idea at a time per run.
-
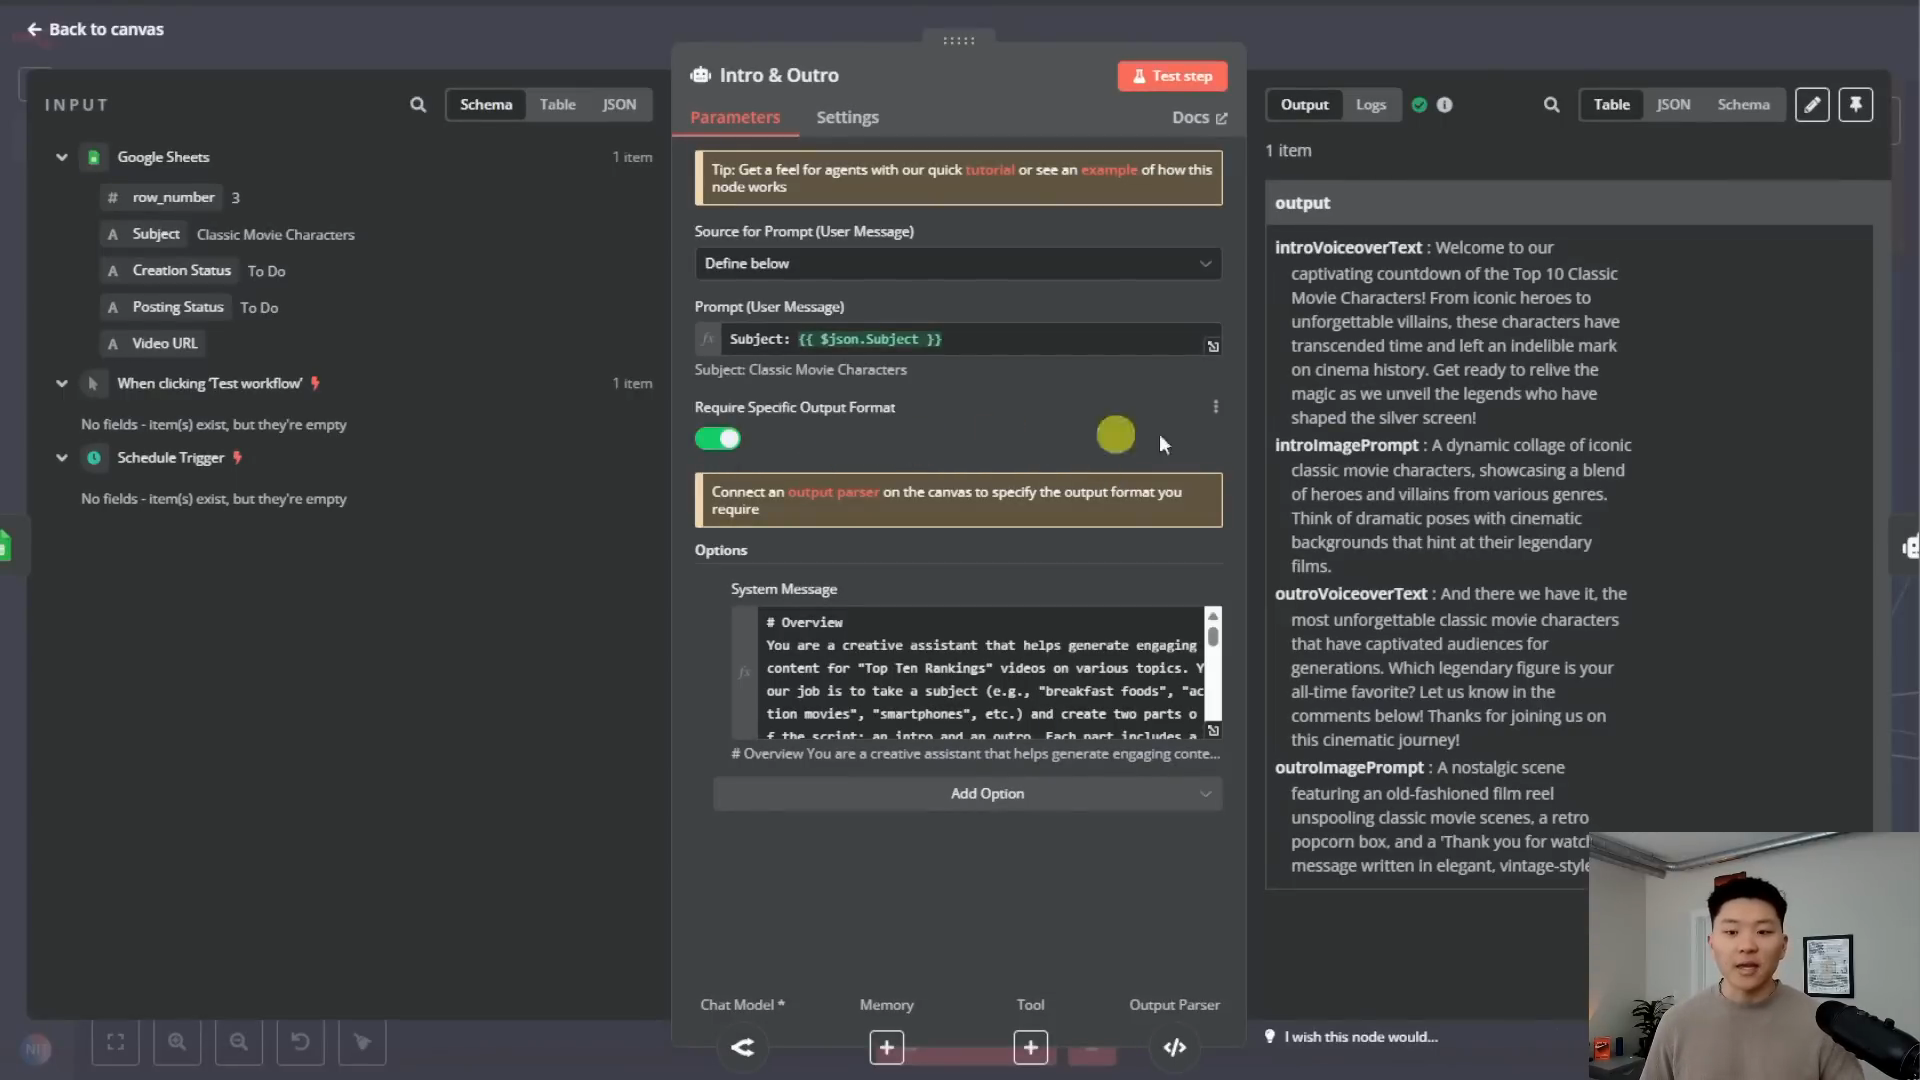
Intro & Outro Node (AI Agent)
- This node uses a language model to write the introduction and conclusion scripts, plus prompts for relevant intro/outro images.
- Double-click the node.
- Credentials: Connect your model provider (e.g., OpenRouter, OpenAI).
- Model: Choose a model (e.g., GPT-4o).
- Prompt (User Message): This node needs the Subject from the Google Sheet. You'll map this dynamically. Click the little target icon (
{}) next to the input field, go to Nodes -> Google Sheets -> Output Data -> JSON -> Subject. It should insert something like{{ $('Google Sheets').item.json.Subject }}. The video shows the specific format needed. - Require Specific Output Format: Ensure this is ON and configured (as shown in the video/template) to output
introVoiceoverTest,introImagePrompt,outroVoiceoverTest, andoutroImagePrompt.
-
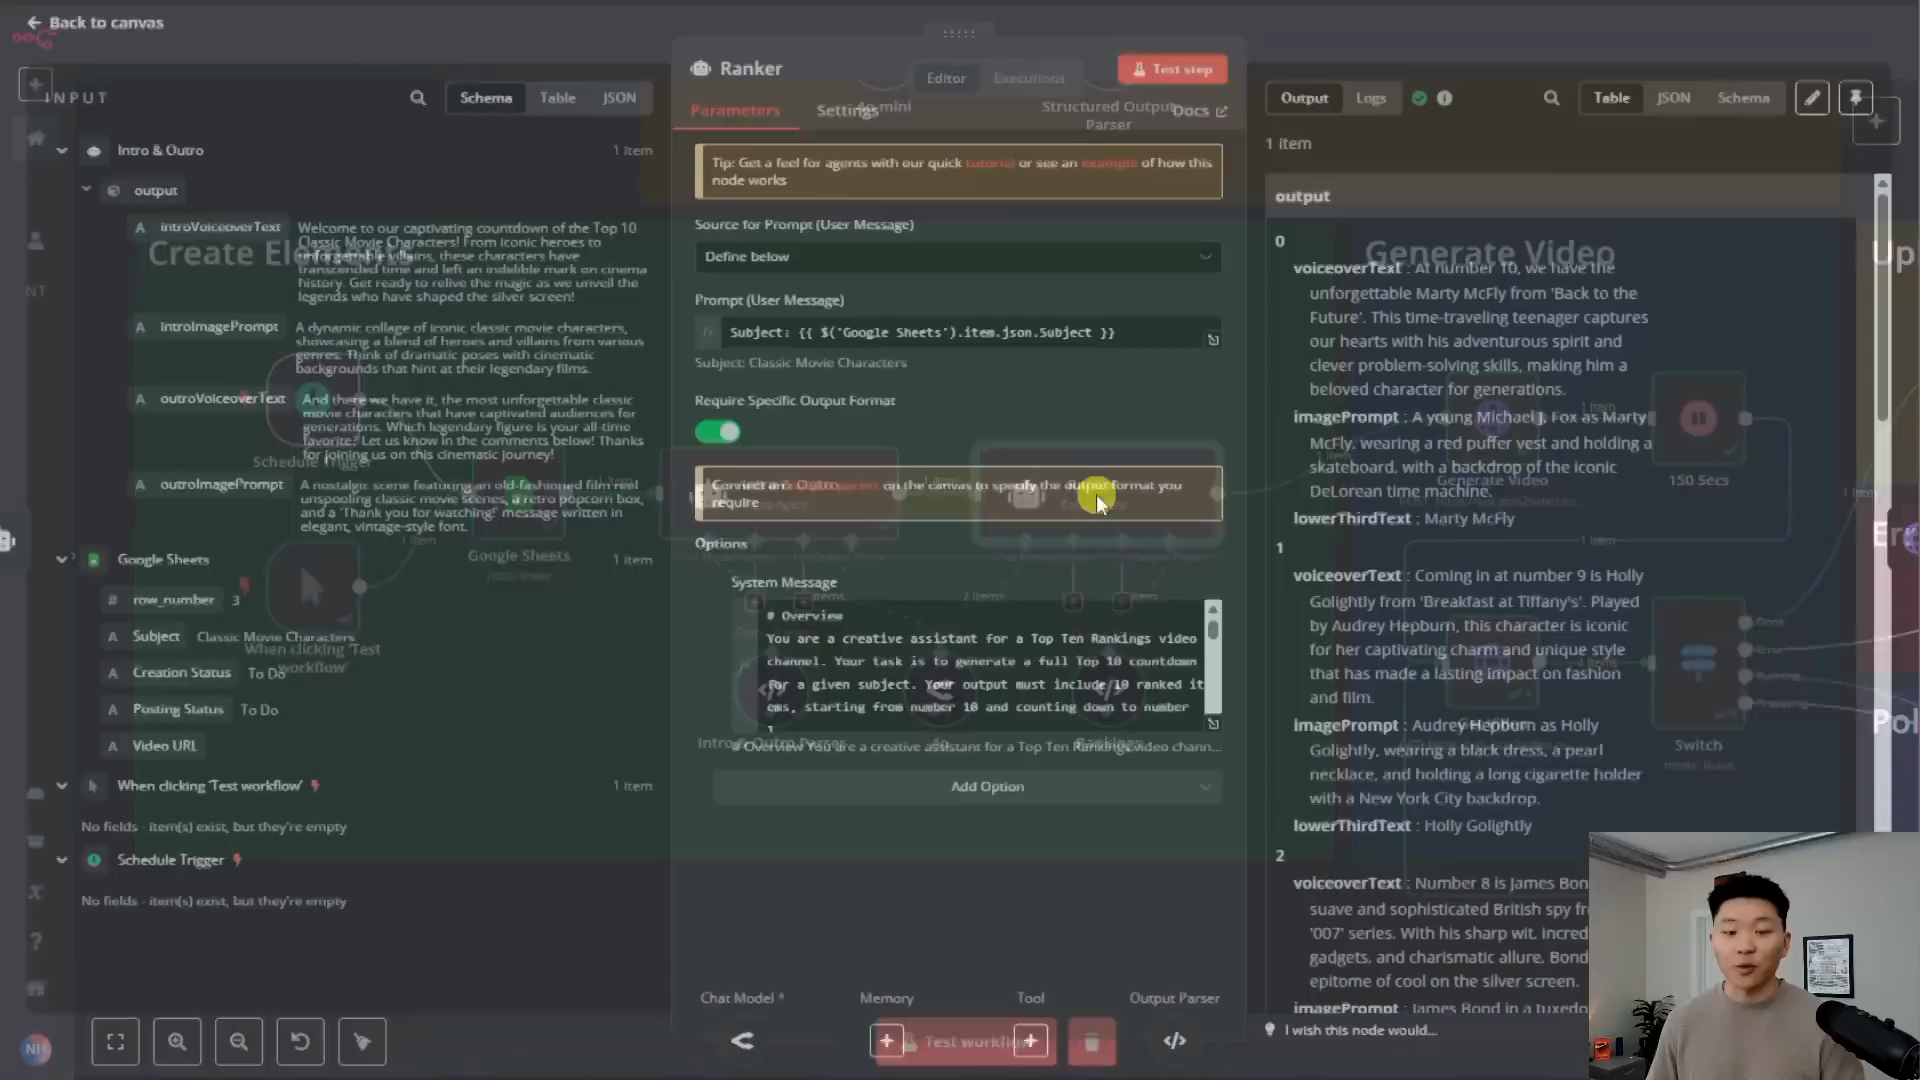
Ranker Node (AI Agent)
- This node uses a language model to generate the Top 10 list itself (items 10 down to 1), including a short script and an image prompt for each item.
- Double-click the node.
- Credentials & Model: Select the same provider and model as the Intro/Outro node.
- Prompt (User Message): Map the Subject from the Google Sheet node here, just like in the previous node.
- Require Specific Output Format: Ensure this is ON. This node needs to output an array (list) where each item contains
voiceoverText,imagePrompt, andlowerThirdTextfor each of the 10 rankings.
-
Generate Video Node (HTTP Request POST)
- This is where we talk to JSON2Video!
- Double-click the node.
- Method:
POST - URL:
https://api.json2video.com/v2/movies - Authentication:
Generic Credential Type - Generic Auth Type:
Header Auth - Credentials for Header Auth: Click "Create New".
- Name:
x-api-key - Value: Paste your JSON2Video API Key here.
- Save the credential (give it a name like "JSON2Video API Key").
- Name:
- Body Content Type:
JSON - Specify Body:
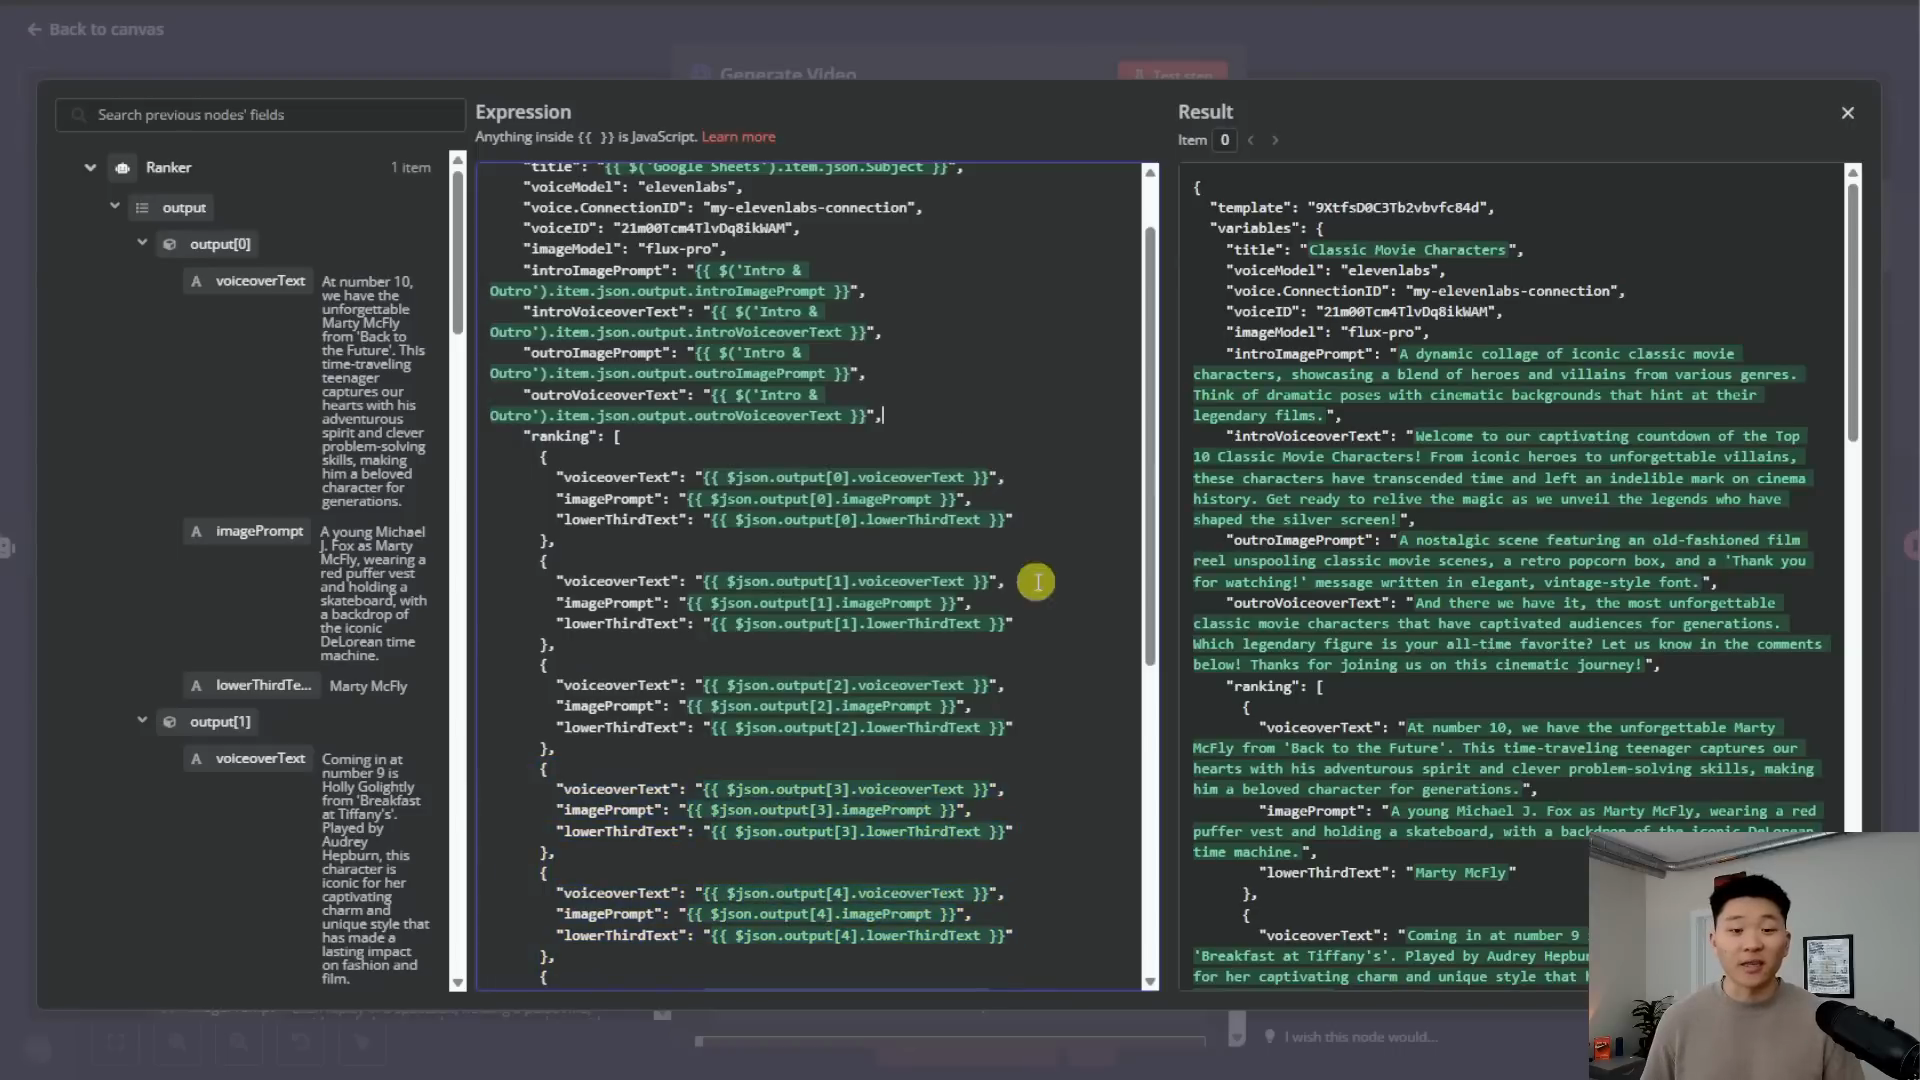
Using JSON - JSON: This is the crucial part where you structure the request for JSON2Video. You need to map the outputs from the previous agent nodes into this structure. The video shows this in detail (around 11:56 - 12:42), but the basic structure is:
- Reference the specific
templateID provided by JSON2Video for this "Top 10" style. - Pass the video
title(from the Google Sheet Subject). - Define
voiceModel,voiceConnectionID,voiceID(if using ElevenLabs). - Define
imageModel. - Pass the
introImagePromptandintroVoiceoverText(from the Intro/Outro node). - Pass the
outroImagePromptandoutroVoiceoverText(from the Intro/Outro node). - Pass the
rankingarray, mapping thevoiceoverText,imagePrompt, andlowerThirdTextfor each of the 10 items (from the Ranker node). This involves using N8N expressions to loop through the Ranker's output array.
- Reference the specific
-
Polling Loop (Wait, Get Video, Switch)
- Video generation isn't instant. We need N8N to wait and check if it's ready. This is called "polling".
- Wait Node: Double-click. Set "Wait Amount" (e.g., 150 seconds as in the video, maybe more to be safe like 240) and "Wait Unit" to "Seconds".
- Get Video Node (HTTP Request GET):
- Double-click.
- Method:
GET - URL:
https://api.json2video.com/v2/movies - Authentication: Select the same JSON2Video API Key credential you created earlier.
- Send Query Parameters: Toggle ON.
- Query Parameters: Add a parameter named
project. For the value, map theprojectID received from the "Generate Video" node's output (e.g.,{{ $('Generate Video').item.json.project }}).
- Switch Node:
- Double-click. This node checks the video status.
- Mode:
Rules - Routing Rules: Add rules based on the
statusfield from the "Get Video" node's output:- Rule 1 (Done): If
{{ $('Get Video').item.json.movie.status }}Is Equal Todone, set Output Name toDone. This path continues the workflow. - Rule 2 (Error): If
{{ $('Get Video').item.json.movie.status }}Is Equal Toerror, set Output Name toError. Connect this to the "Error" branch (Google Sheet update). - Rule 3 (Running/Preparing): If
{{ $('Get Video').item.json.movie.status }}Is Equal Torunning, set Output Name toRunning. - Rule 4 (Running/Preparing): If
{{ $('Get Video').item.json.movie.status }}Is Equal Topreparing, set Output Name toPreparing.
- Rule 1 (Done): If
- Connect the "Running" and "Preparing" outputs back to the Wait Node before the "Get Video" node. This creates the loop.
-
Created Video Node (Update Sheet - Success Path)
- Connect this node to the "Done" output of the Switch node.
- Double-click.
- Configure this like the first Google Sheets node (Credentials, Document, Sheet).
- Operation:
Update Row - Column to match on:
Subject - Subject (using to match): Map the
Subjectfrom the first Google Sheets node ({{ $('Google Sheets').item.json.Subject }}). - Values to Update:
- Add field
Creation Status, set value toCreated. - Add field
Video URL, map the video URL from the "Get Video" node ({{ $('Get Video').item.json.movie.url }}).
- Add field
-
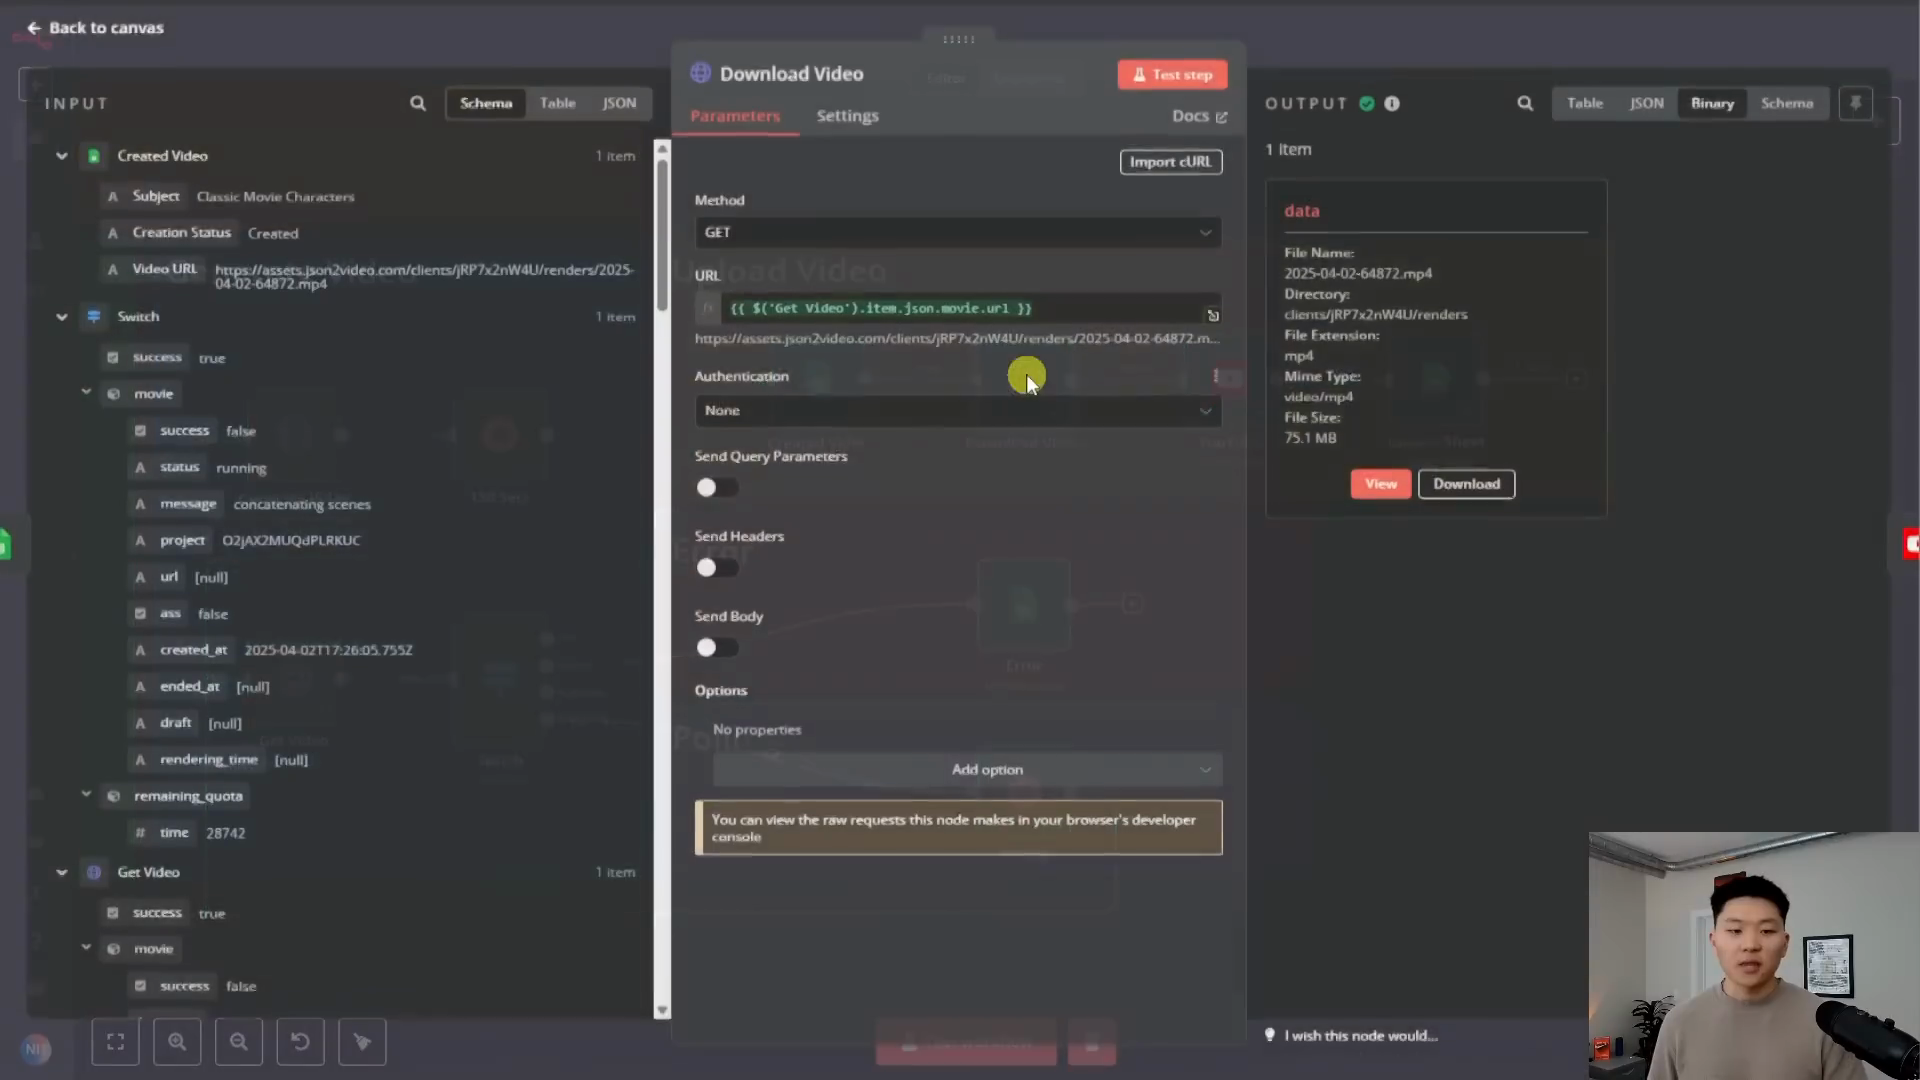
Download Video Node (HTTP Request GET)
- Connect this node after the "Created Video" node.
- Double-click.
- Method:
GET - URL: Map the video URL from the "Get Video" node (
{{ $('Get Video').item.json.movie.url }}). - Authentication:
None(the URL is public). - Response Format:
File(This is crucial!)
-
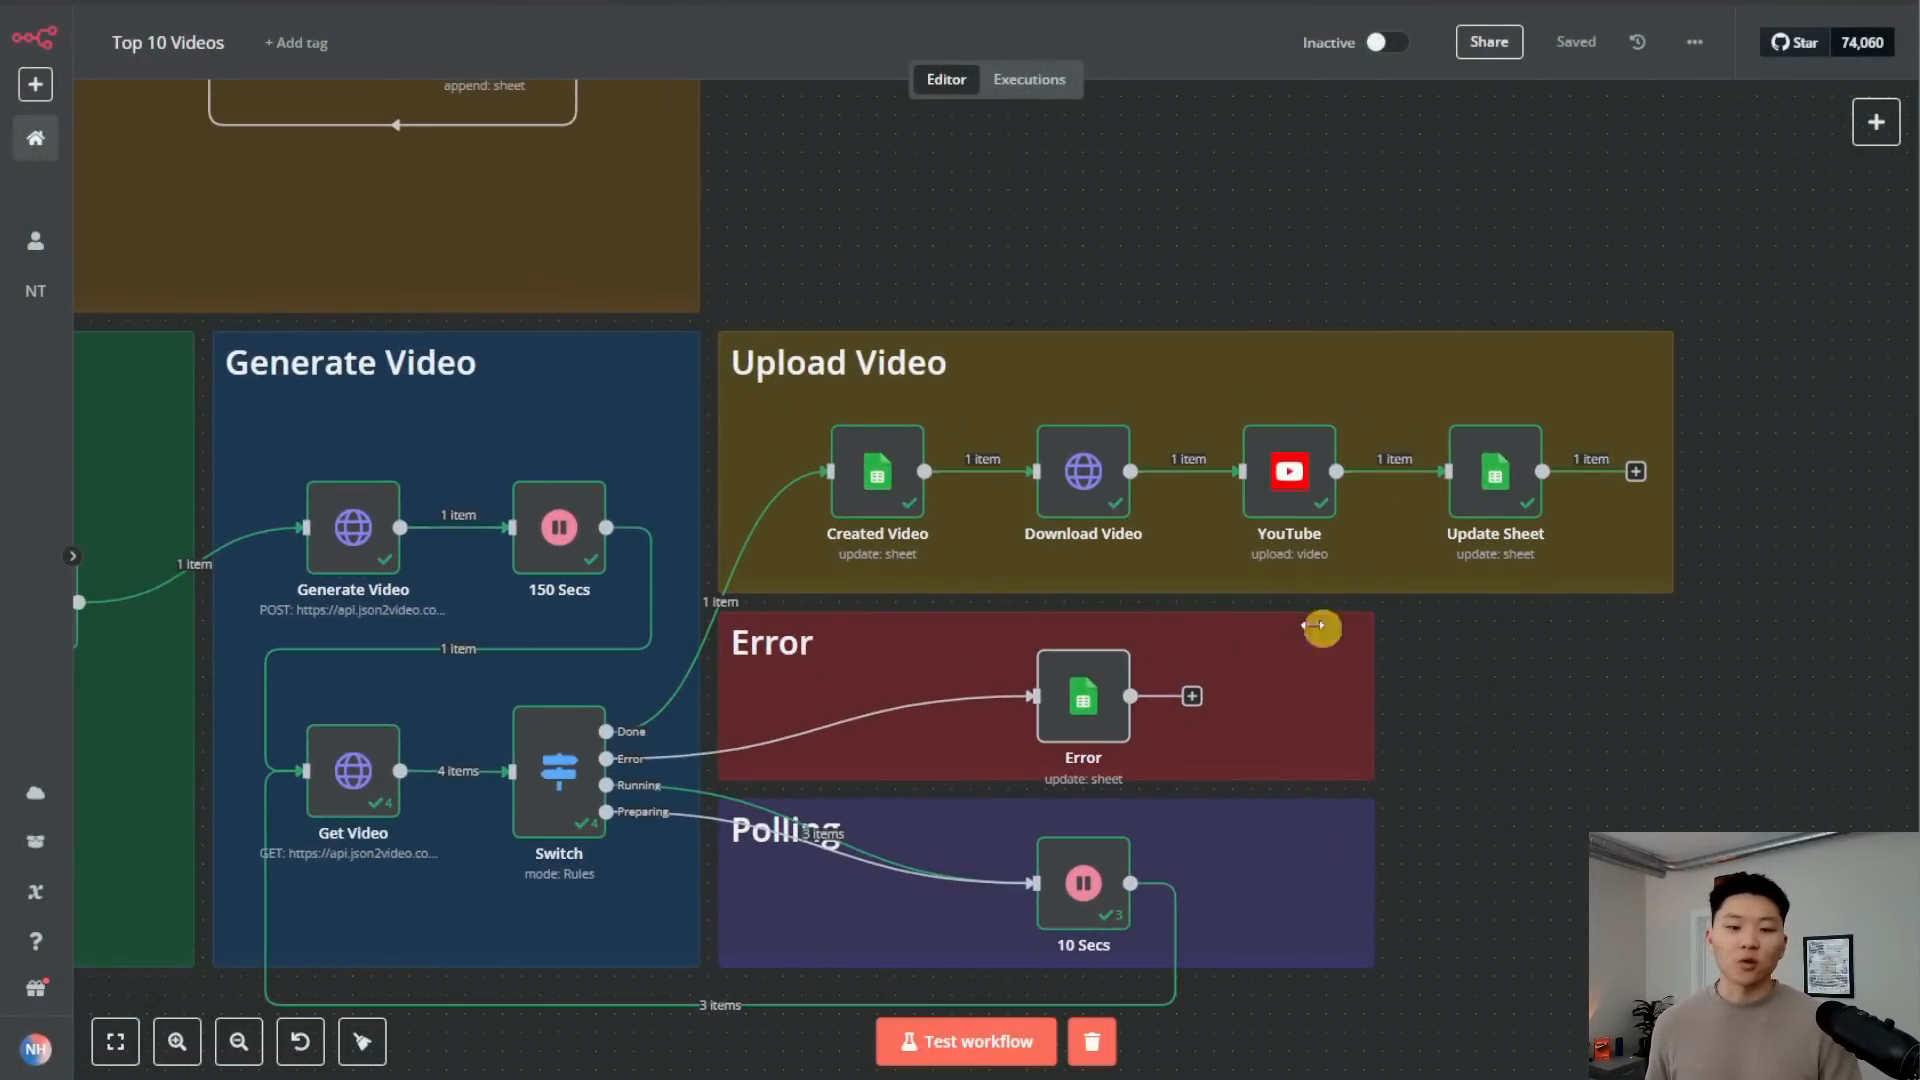
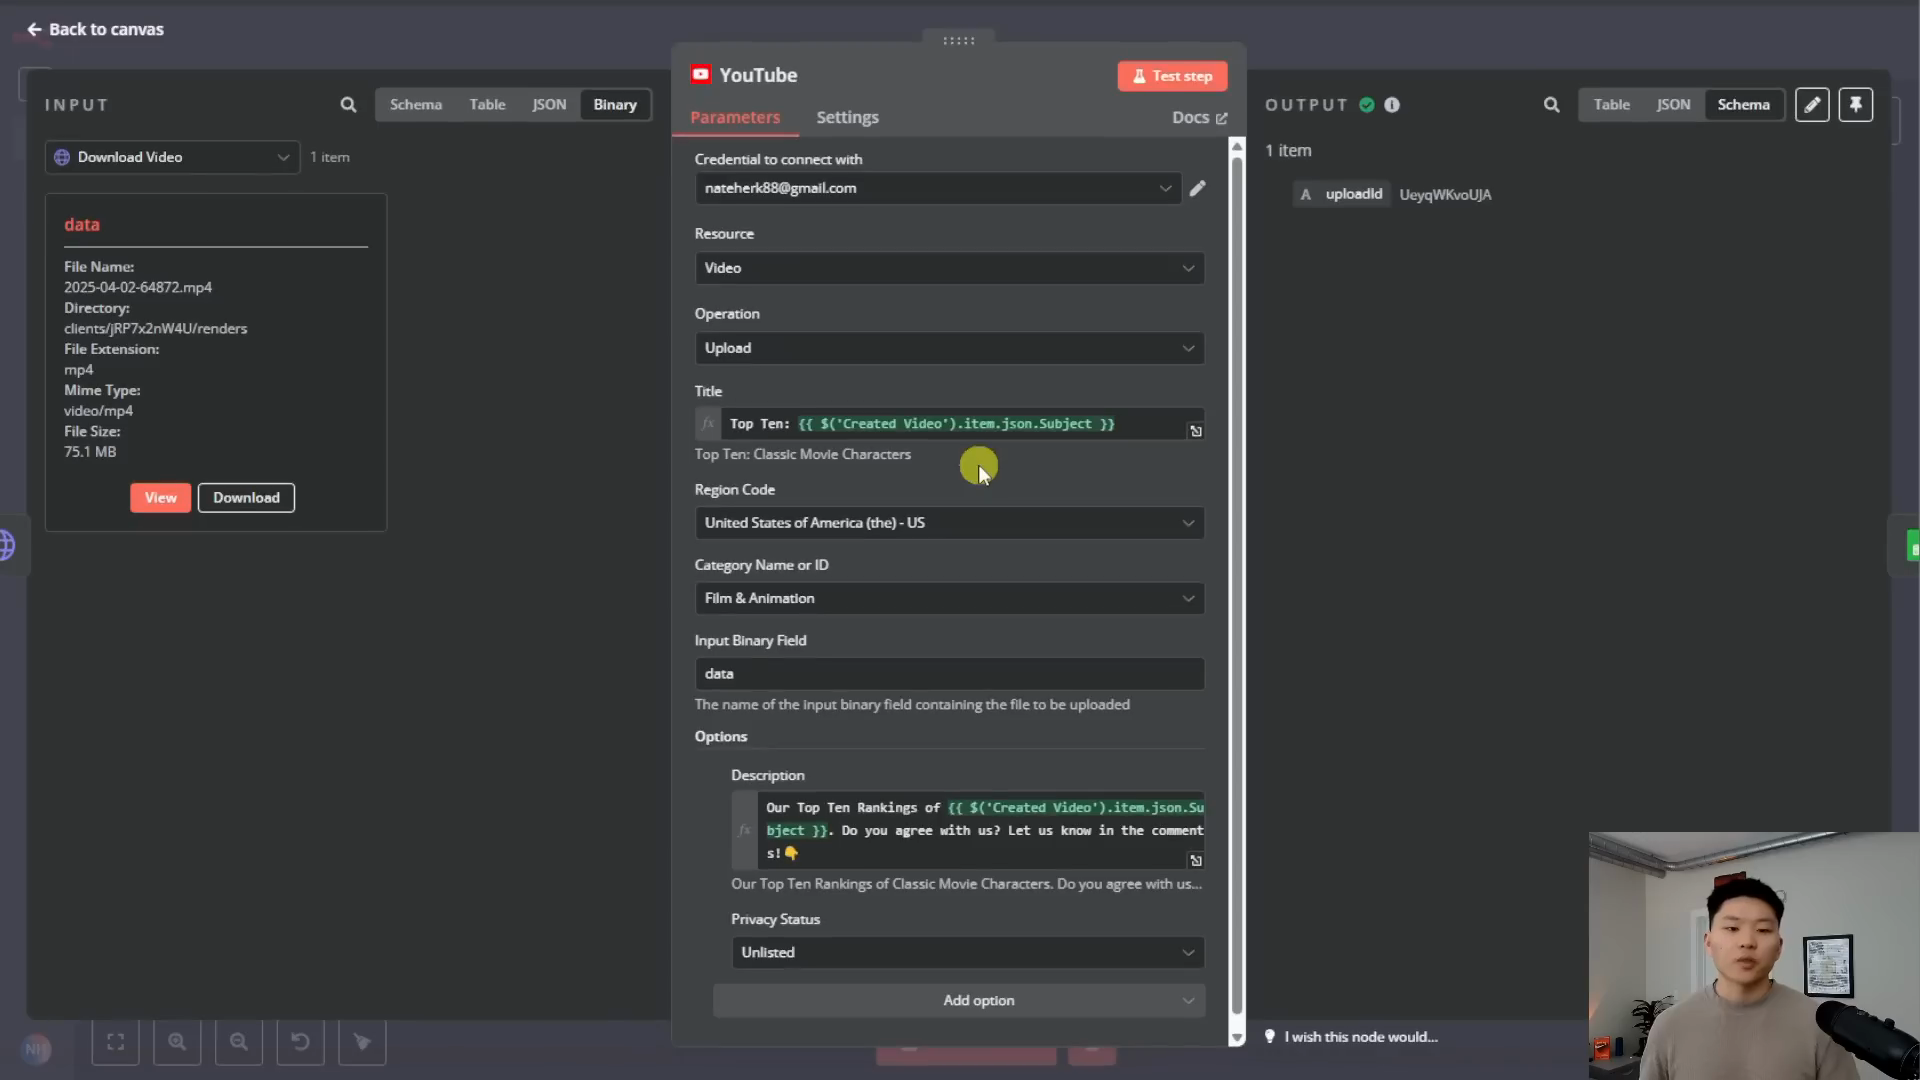
YouTube Node (Upload Video)
- Connect this node after the "Download Video" node.
- Double-click.
- Credentials: Connect your Google/YouTube account using OAuth2 credentials. You'll need to set this up in Google Cloud Console first (enable YouTube Data API v3, create OAuth credentials). Follow N8N's documentation or the video linked in the original video description for this setup.
- Operation:
Upload - Title: Create a title, e.g.,
Top Ten: {{ $('Google Sheets').item.json.Subject }}. - Input Binary Field:
data(This tells the node to use the file downloaded in the previous step). - Options:
- Add Option -> Description: Create a description, e.g.,
Our Top Ten Rankings of {{ $('Google Sheets').item.json.Subject }}. Do you agree with us? Let us know in the comments! 👇. - Add Option -> Privacy Status: Set to
Unlisted.
- Add Option -> Description: Create a description, e.g.,
-
Update Sheet Node (Final Update)
- Connect this node after the "YouTube" node.
- Double-click.
- Configure this like the other Google Sheets nodes (Credentials, Document, Sheet, map by Subject).
- Operation:
Update Row - Values to Update: Add field
Posting Status, set value toUnlisted.
-
Error Node (Update Sheet - Error Path)
- Connect this node to the "Error" output of the Switch node.
- Double-click.
- Configure like other Google Sheets nodes.
- Operation:
Update Row - Column to match on:
Subject - Subject (using to match): Map the
Subjectfrom the first Google Sheets node. - Values to Update: Add field
Video URL, set value toError.
Step 4: Activate and Run!
- Save your workflow.
- Toggle the workflow from "Inactive" to "Active" in the top right corner.
- If you used a Schedule Trigger, it will run automatically based on your schedule. If you kept the manual trigger, click "Test workflow" or "Execute workflow" to run it once.
- Watch N8N execute each step. It will wait during the polling loop.
- Check your YouTube channel's "Content" section for the unlisted video!
- Check your Google Sheet – the status columns should be updated.
Conclusion
Congratulations! You've just set up an automated system to create and upload "Top 10" YouTube videos. While the initial setup involves connecting a few services, once it's running, it can save you a massive amount of time.
Next Steps & Customization:
- Customize the Template: Go to JSON2Video and edit the template (or duplicate it first!) to change fonts, colors, animations, or layout.
- Different List Types: Adapt the prompts to create "Top 5", "Top 7", or completely different types of list videos.
- Short-Form Video: Modify the JSON2Video template and N8N logic to create vertical videos for YouTube Shorts, TikTok, or Instagram Reels.
- Add More Ideas: Keep adding topics to your Google Sheet with the status "To Do", and the automation will pick them up!
Remember to check the video description and the free Skool community mentioned for the downloadable N8N workflow, the Google Sheet template, and links to all the services used. Happy automating!
Published on April 4th, 2025